Segmenting CPG merchants using trade areas characteristics

Understanding customers (as merchants are referred to within the CPG industry), and prioritizing which are the best points of sale to push your products through, is as important now as ever for the CPG industry.
A key analysis towards understanding your merchants’ potential is to identify the characteristics of their trade areas (e.g. population, visitors, proximity to transport network, etc.) and to perform an appropriate profiling and segmentation of them.
In this example, we showcase how you can leverage CARTO’s Analytics Toolbox for BigQuery to segment your customers or merchants based on the characteristics of their trade areas. A more detailed description can be found in this blogpost.
Step 1 - Defining the trade area for each merchant
For this example, we will use the locations of restaurants and cafeterias in the high density urban areas surrounding the bay area of San Francisco, which you can find available at cartobq.docs.cpg_product_launch_bay_area_store_locations.
To start with, the user needs to specify the trade areas of each merchant. This is done using the GENERATE_TRADE_AREAS function from the Analytics Toolbox. The inputs to the function are:
The merchant locations.
The method to generate the trade areas, with 3 available options: buffer, number of layers using a spatial index, and isolines.
The specific arguments for the selected method of trade area generation.
Herein, as a method for the trade areas we have selected a buffer and we have defined a 500m radius. This will generate a 500m buffer around each location.
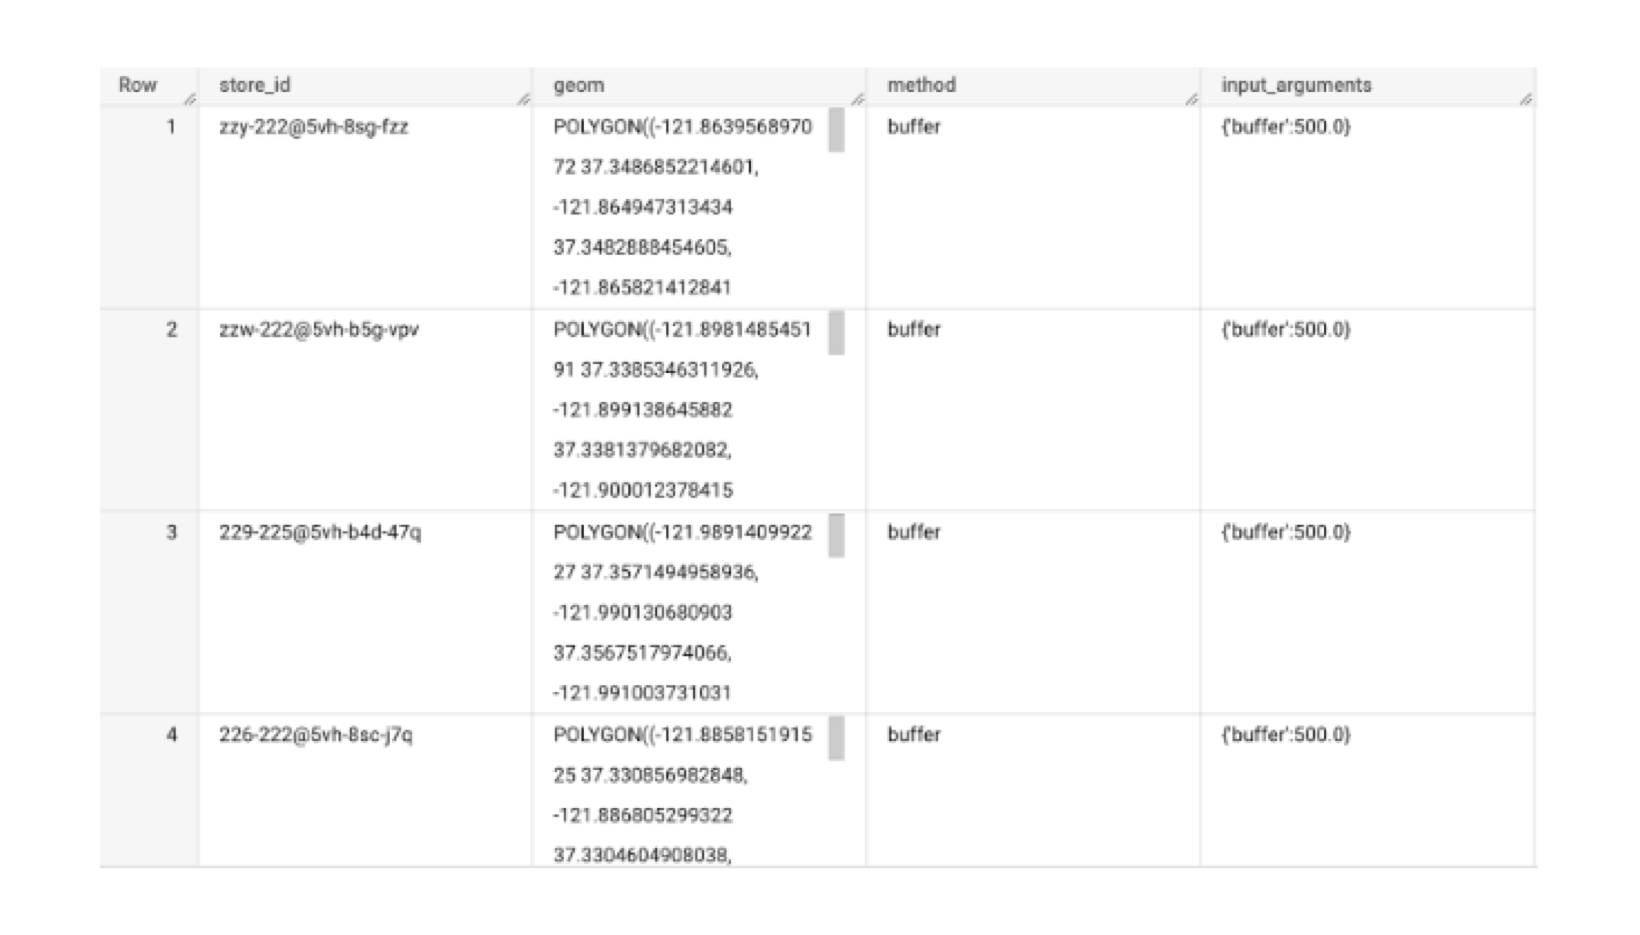
An example of the table produced by the above function, cartobq.docscpg_product_launch_bay_area_high_urban_trade_areas, is illustrated below. store_id is the unique identifier of each location and geom is the geometry of the trade area.

Step 2 - Enriching the trade areas with the desired features for the analysis
In this step, the trade areas from Step 1 need to be enriched with the relevant spatial information to then analyze the relationship amongst them. The user can either use preprocessed data for each location, enrich the trade areas using the user’s own proprietary data, or enrich them with third-party data from CARTO’s Data Observatory subscriptions. This step is done with the CUSTOMER_SEGMENTATION_ANALYSIS_DATA procedure.
As input, the user should provide:
The table with location information about the merchants (unique id and trade area geometry), and optionally any preprocessed feature associated with the trade area;
The variables/features from Data Observatory subscriptions to be used, and the location of the Data Observatory subscription in the data warehouse.
Features from the users’ own tables.
In this example, we consider the following features would be the relevant for this exercise:
Consumer spending: Food and beverage expenditure (at home and out of home), alcoholic expenditure;
Points of Interest: Total number of restaurants and cafés in area (i.e. HORECA count).
In order to enrich with the previous data, we simulate the scenario in which the user:
Has the consumer spending data in their own 1st party tables, which can be found at:
cartobq.docs.cpg_product_launch_bay_area_consumer_spending; andadds one pre-processed feature to the input table, the total number of HORECA POIs inside each trade area, directly computed in the input query (see query below).
Bear in mind that this simulation is done to demonstrate a way to incorporate additional pre-processed features.
The query to get the number of HORECA POIs within each merchant’s trade area is:
The function call to build the data and conclude the Step 2 is:
The outputs of this step are:
The final enriched table
cartobq.docs.cpg_product_launch_bay_area_step_2_custom_enrich,A table with the correlation between every pair of features
cartobq.docs.cpg_product_launch_bay_area_step_2_correlationA table with descriptive statistics for each feature
cartobq.docs.cpg_product_launch_bay_area_step_2_descriptives.
Examples of the last two tables can be seen below.
Correlation table
This table shows the correlation between every pair of features. The col1 and col2 columns indicate the pair of features, while the column corr contains the value of correlation for each pair. It is used to identify relationships amongst the features and whether PCA would benefit the analysis or not.

Descriptive statistics table
This table contains the descriptive statistics for each feature. A row corresponds to a feature. The table schema is exactly the same as the one from the describe function of Python Pandas package. Descriptive statistics include those that summarize the central tendency, dispersion and shape of a dataset’s distribution, excluding NaN values.

Step 3 - Running the segmentation algorithm
In this step, the enriched table from step 2, cartobq.docs.cpg_product_launch_bay_area_step_2_enrich, is used for segmenting the different merchants by means of the KMeans clustering algorithm. The user needs to define whether Principal Component Analysis (PCA) should be used or not, by specifying the pca_explainability_factor. In this case, it is set at 0.9. In addition, the user defines the clustering scenarios to be tested, for example 6 and 7 clusters.
The output gives the customers´ locations assigned to segments, as well as a series of descriptive statistics that focus on features (e.g., the percentiles of the entire input data and of each segment, for each variable), or that focus on the quality of the model output. The output tables can be found at:
Segment assignment:
cartobq.docs.cpg_product_launch_bay_area_step_3_clustersSegments descriptives:
cartobq.docs.cpg_product_launch_bay_area_step_3_clusters_descrClustering statistics:
cartobq.docs.cpg_product_launch_bay_area_step_3_clusters_stats
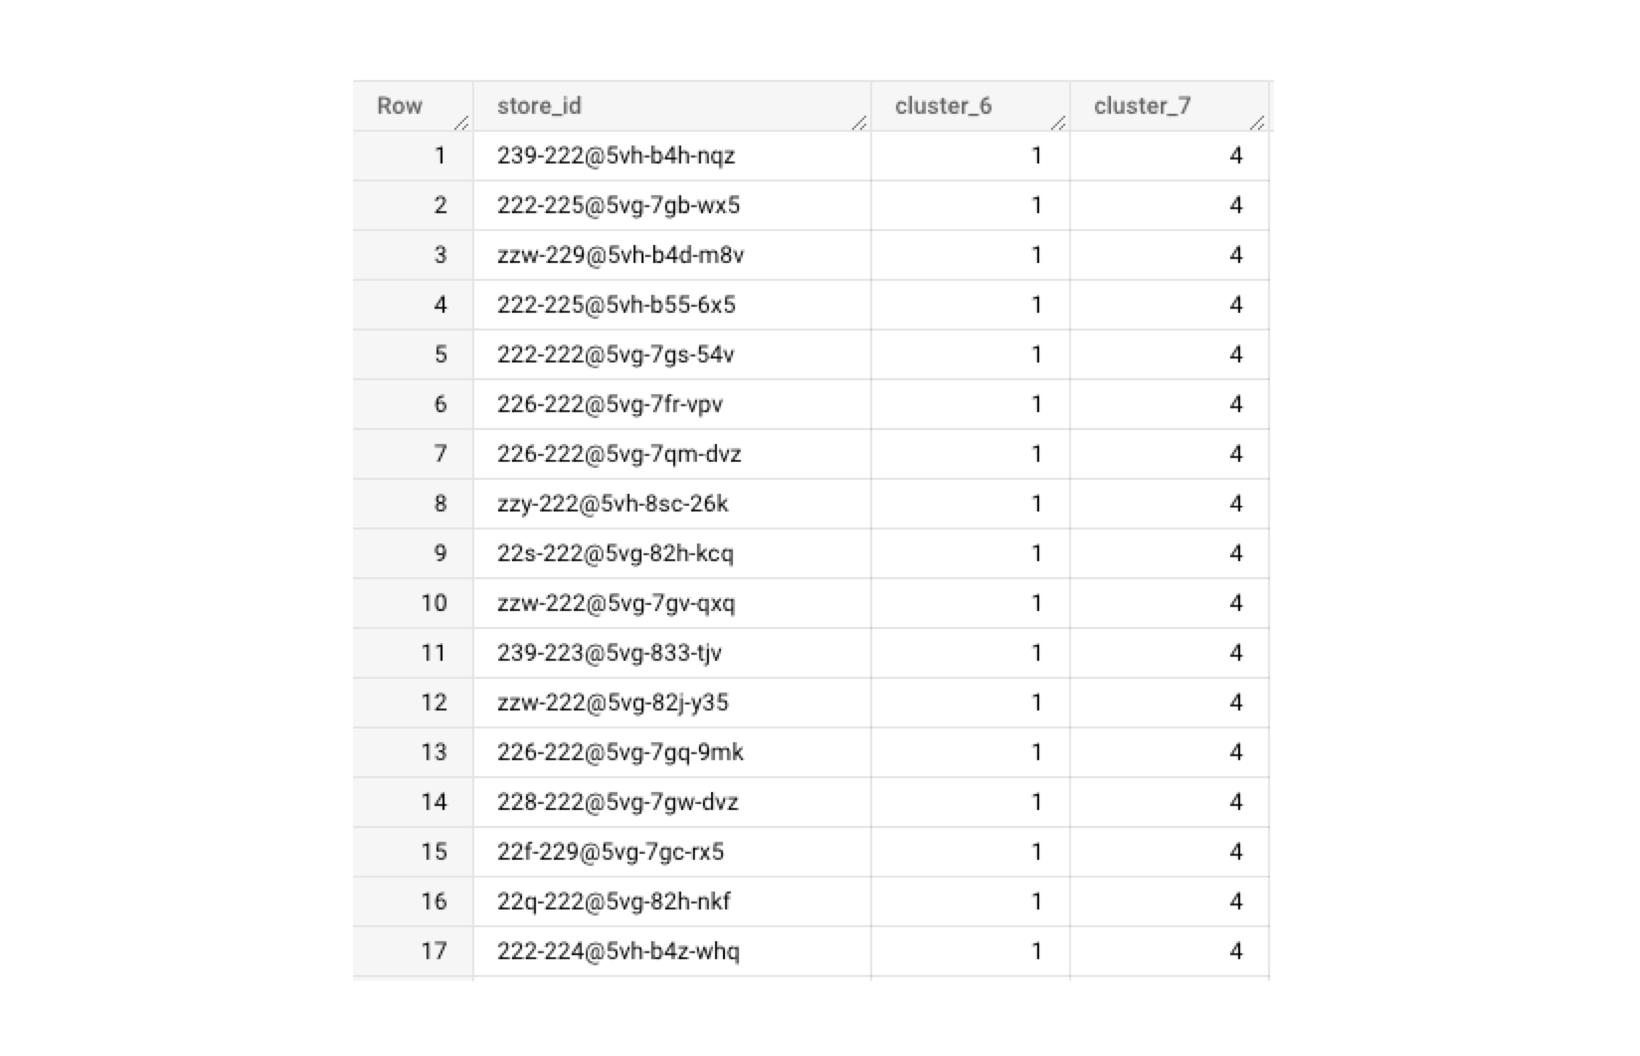
Below we can see the resulting segment assignment table in which we have every merchant assigned to one cluster. Columns cluster_6 and cluster_7 contain the cluster to wich each merchant is assigned to when solving for 6 and 7 clusters, respectively.

An example of the second table, the descriptive statistics for each case/cluster, can be seen below. Each row corresponds to a clustering scenario, a cluster label and the feature name. For each of these tuples, the descriptive statistics are shown. For example, the first 3 columns of the 6th row are: cluster_7, value (cluster label) 1 and horeca_count. This row refers to the scenario with 7 clusters/segments, the 1st cluster of that scenario and for the feature horeca_count, the mean value is 233.53, the standard deviation is 53.22, the min value is 141 etc.

And finally the output of the last table, with the metrics to measure the quality of the clustering (namely, David Bouldin index and within sum of squares) is as follows.

In the map below, the result from the segmentation of the scenario with the 6 clusters can be seen. For a detailed description on how to use the resulting tables and visualization to label clusters based on business terms, please refer to this blogpost.
Last updated
Was this helpful?

